Creating multiple masks with Renderman
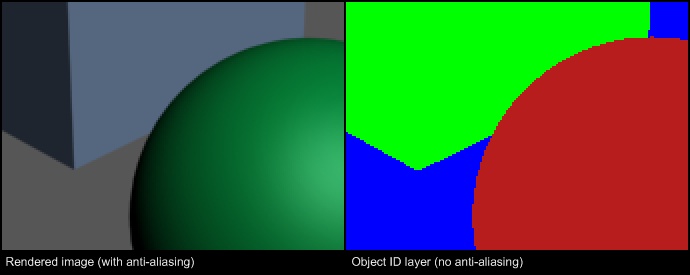
This tip describes how to create multiple masks with Renderman. This technique comes to expand the simple RGBA as masks technique. The problem with masks is usually anti-aliasing. If you use an object channel, it can only have a discreet value for each pixel, meaning that each pixel can hold only one object id value (as demonstrated in the image below,) and this means no anti-aliasing.

The reason no anti-aliasing can be applied to the ID channel, is that if we used anti-aliasing, the value of the pixel would change, and therefore no longer represent the right object. For example, let say a given pixel is occupied by an object with ID of 2. That pixel in the ID channel would have the value of 2. Now if this pixel was semi-transparent with a transparency value of 0.5 (due to anti-aliasing, or even object transparency), then it's value would be 1 (= 2 * 0.5), and the value 1 represents a completely different object.
Renderman gives a way to create masks by using the Matte attribute, however, if you wish to isolate multiple objects (each on it's own,) you'd have to render the scene multiple times, each time changing the Matte attribute of a different object and saving the results to different files.
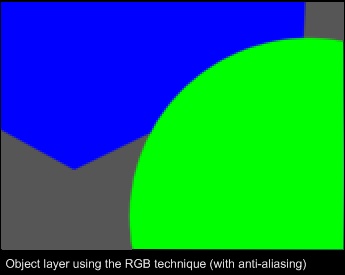
Then there's the RGB method. It's very simple to implement. All you need to do is assign each object a pure RGB color (pure red, pure greenor pure blue), then you can extract each of these channels in compositing and use it as a mask. This method solves the anti-aliasing issue (as shown in the image below)

The problem with the RGB technique is that it is limited to only 3 masks (it can be extended to 4 using the alpha channel) in a single file. If you need more masks, you'll have to render multiple times, each time assign the colors to different object.
The solution I've found to this issue is this: creating an array of object ID's in SL, and saving each ID in a different layer in an openEXR file. This allows you create many masks in a single file (the number of masks is limited by renderer memory).
The shader itself is very simple:
surface multiMatte (
    uniform float id=0;
    output varying float
    ids[200]=0;
){
    Oi = Os;
    Ci = Cs * Oi;

    if (id != 0) {
    ids[0] = id;
    ids[id] = comp((color "hsv" Oi), 2);
    }
}
A few notes about this shader:
- If you need the object's opacity in the mask, you'll need to add this code (except for the Oi and Ci statements) to each object's shader you wish to get a mask for.
- The ids output is initialized here with 200 ID's. If you need more, change it to a higher value (note that this will cost you more memory at render time).
- You don't have to use Oi and Ci. They are there just to demonstrate a typical usage in shaders. There are some caveats about opacity - see about that below.
- If you don't need to take into account the object's opacity in the mask, you can change the line ids[id] = comp((color "hsv" Oi), 2); to ids[id] = 1; this will speed things a bit.
Now the caveats. There is an issue when using the object's opacity. For some reason, when you set the object's opacity below 1, if Oi is set to this opacity, the shader is not calculated for that object, unless the zthreshold is lower than the opacity (as you'll see in the sample RIB below.) There are 2 solutions for this:
- As mentioned, lower the zthreshold value. This have the unwanted side effect of making the image opaque.
- If you don't care about the object's opacity in the mask, you could render the scene once without the multiMask shader, and once with the multiMask shader (without the Oi and Ci statements) replacing the original shader.
You'll have to decide which one works best for your specific case.
Below, there's a sample RIB to test the shader. It will result in 2 files, a tif file with the rendered image and an exr file with the masks. The exr file this method generates has the following structure: the first layer (0) is a basic ID channel with all objects visible and each one has it's ID as the channel's value. This is especially good for finding the layer's ID you need easily. The other layer each holds a mask channel specific to the object (or objects) with the layer number's ID. For example, all objects with ID 3 will be in layer 3 of the exr. The values in these layers are the object's opacity in each pixel.
One more this, if you're using maya, you can assing the ID using primvars instead of directly in the shader attributes.
## Sample RIB for the multiMatte shader

# The zthreshold is set to 0 because of opacity issues.
Option "limits" "color zthreshold" [0.0 0.0 0.0]
Display "sphere1.tif" "file" "rgb"
# Define the display channel for the ids. Replace the array count (4 in this case)
# with the highest id number you have in the scene plus 1.
DisplayChannel "float[4] ids"
Display "+sphere1_matte.exr" "openexr" "ids" "int[4] quantize" [0 0 0 0] "float dither" [0]
Format 320 240 1
Projection "perspective" "fov" [30]
# Translate Camera (moves world origin 6 units towards +Z)
Translate 0 0 6

WorldBegin
 LightSource "ambientlight" 1 "intensity" [0.2]
 LightSource "distantlight" 2 "intensity" [1.2] "from" [0 0 -6] "to" [0 0 0]

  # Define a red unit sphere at 0 0 0
  AttributeBegin
    Translate -0.5 0 0
    Color [1.0 0.0 0.0]
    Opacity [0.5 0.5 0.5]
    # Assign the surface and set the id for this object.
    Surface "multiMatte" "uniform float id" [2]
    Sphere 1 -1 1 360
  AttributeEnd

  # Define a green unit sphere at 0 0 0
  AttributeBegin
    Translate 1.0 0 2.0
    Color [0.0 1.0 0.0]
    Surface "multiMatte" "uniform float id" [3]
    Sphere 1 -1 1 360
  AttributeEnd
WorldEnd
4 comments
very nice ideia for multimatte .. I`m trying to test it using 3delight , but with no sucess yet , seems that 3delight do not works with float[200] array type , any tip of it ? tnx for sharing !
Comment from: o.z Member
After quite a lot of testing with 3Delight, here are my conclusions:
1. 3Delight does not support multiple OpenExr layers at this point, so you have to use PSD instead (which is a bit disappointing, since their PSD implementation only supports 8bit images).
2. You have to make sure the size of the arrays is the same in both the SL and the RIB. This means you can’t just put a high value in the SL to avoid re-compiling (unless you also put a high number in the RIB, but that would be a waste for 2 reasons: memory usage and the number of wasted layers in the PSD file.)
3. 3Delight doesn’t seem to support the SL short writing: color “hsv” Os; so it needs to be changed to ctransform("hsv", Oi).
So, once we realize these issues, here are the changes that would make it work with 3Delight:
The shader should now look like this:
 surface multiMatte (

    uniform float id=0;

    output varying float ids[4]=0;

){

    Oi = Os;

    Ci = Cs * Oi;

    if (id != 0) {

        ids[0] = id / (arraylength(ids) - 1);

        ids[id] = comp(ctransform("hsv", Oi), 2);

    }

}
In the RIB, the only change needed is to the additional display line. The output is now set to PSD, and note the quantize values to convert the float to 8bit values.
Display "+output_multi_layer.psd" "psd" "ids" "int[4] quantize" [0 255 0 255] "float dither" [0]
One more thing to note about the RIB, the number in this line:
DisplayChannel "varying float[4] ids"
_MUST_ be the same as the number in ids array declaration in the SL (in the line: output varying float ids[4]=0; )
If they are not the same, all layers will be rendered black.
Cheers,
o
Thank you very much .!! I never gonna got this by my self . thanks for sharing , this ideia gonna help me a lot .. cos render masks requests to comps is a big pain in the a** when you first have made this shader , did you have realize this from scratch ? or is a kind of regular method for mask used in CG studios ? .cos is the first time I have seen mask renders like this , one objs in each layer of OpenExr or Psd.. cheers !
Comment from: Moritz Moeller Visitor
What’s wrong with using TIF? Perfect for mattes, supports 16bit int and 32bit float precision, if needed. And any number of AOVs.
PSD support in 3Delight was meant for look dev, not use on actual shots.
.mm
This post has 2 feedbacks awaiting moderation...